
Meadows Nordic Center Never Ever Beginner Progression Quick Guide
Download this page as a Word Doc
Goal of a Beginner Lesson
Sharing your passion for the sport and creating fun, safe, and exciting experiences, you can turn students into lifelong cross country Skiers.
What is a Progression?
A progression is a series of steps that logically build on one another, increase in difficulty, and are focused specifically on the students and their goals for the lesson and as a cross country skier. As an instructor matching difficulty and student engagement is critical to a successful progression. At MLC we call this riding the Wave! Too steep a wave (difficulty) you may loose engagement with your student due to frustration. Too shallow a wave you may loose your student by boredom. The ideal wave is building on small successes that build confidence and engagement of the student.
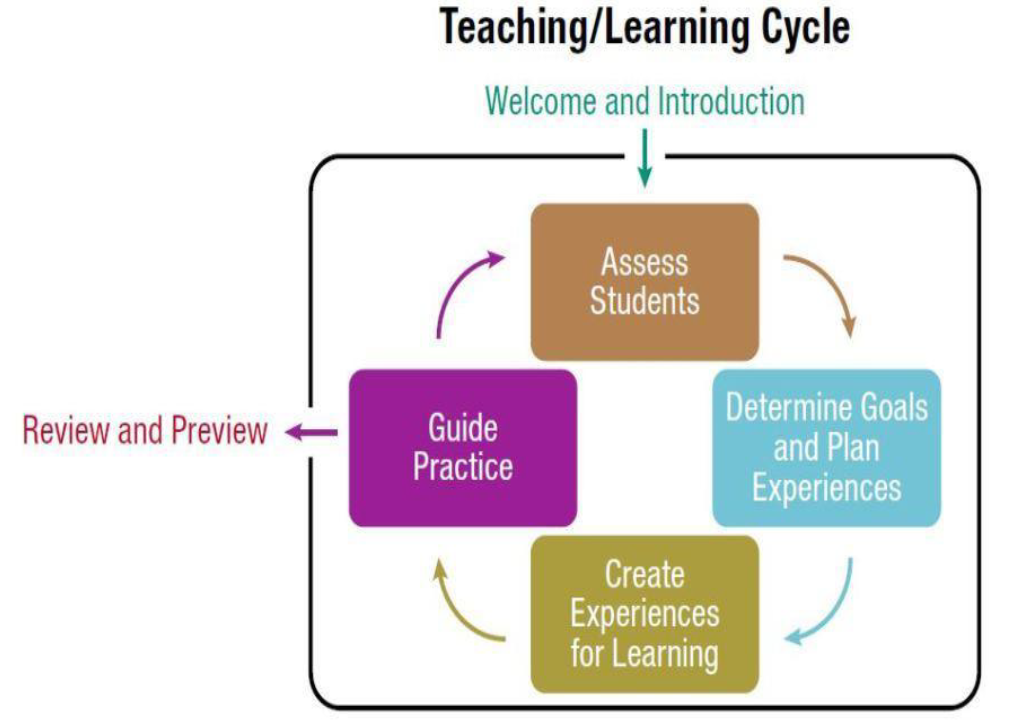 Teaching/Learning cycle
A method of structuring your lesson to optimize the outcomes for your students to keep then riding the wave balancing challenge and engagement with your students.
- Welcome and introduction – Begin connecting with your students –
- Assess Students – Where your students are at now and what they are ready for next
- Determine Goals and Plan Experiences – Make a goal, plan the next progression to get there
- Create Experiences for learning – Work on the planned next progression
- Guide Practice – Builds muscle memory in your student
- Rinse and repeat steps 2 – 5 as needed – Are you ready for the next step or regroup?
- Review and preview – Take-aways from students and you and Preview what comes next
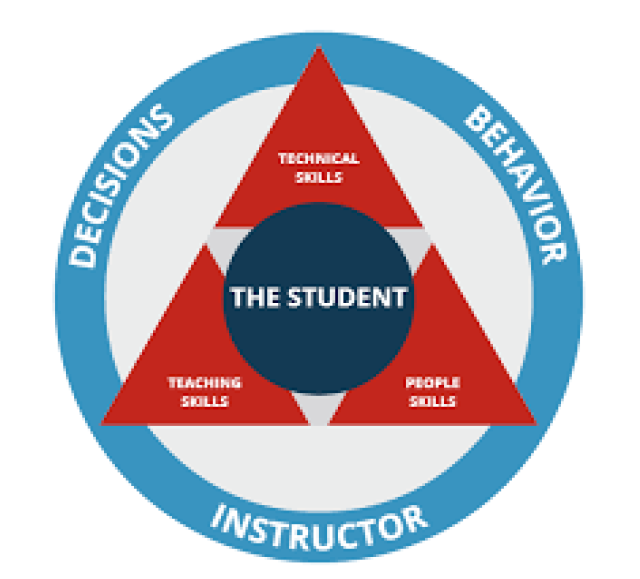 The Learning Connection Model
The Learning Connection serves as a framework for the snowsports instructor’s development and is used as a foundation for all PSIA-AASI instructor educational material.
Student Centered Learning
- The student’s experience is the center of our main goal as an instructor
- Through our decisions and behavior as instructors we interact with the student using our
People Skills – Fundamentals Me – You – Us – Trust
- Develop relationships based on trust
- Engage in meaningful, two way communications
- Identify, understand and manage your emotions and actions as an instructor
- Recognize and influence the behaviors,motivations and emotions of your students
Teaching Skills – Fundamentals Ride The Wave!
- Collaborate on long-term and short-term objectives
- Promote play, experimentation, and exploration
- Facilitate the lerner’s ability to reflect upon experiences and sensations
- Manage information, activities,terrain selection, and pacing
- Adapt to the changing needs of the learner
- Manage Emotional and physical risk
Cross Country Technical Skills – Fundamentals
- Body Position fore/aft – control the relationship of the Center of Mass to the Base of Support to direct pressure along the length of the ski
- Weight Transfer ski to ski – control the Center of Mass to the Base of Support from ski to ski
- Propulsion – Control the timing of body movements while regulating power application through skis and poles to optimize propulsion
- Momentum – Utilize body movements to manage momentum, Glide and Speed control
Cross Country Technical Model
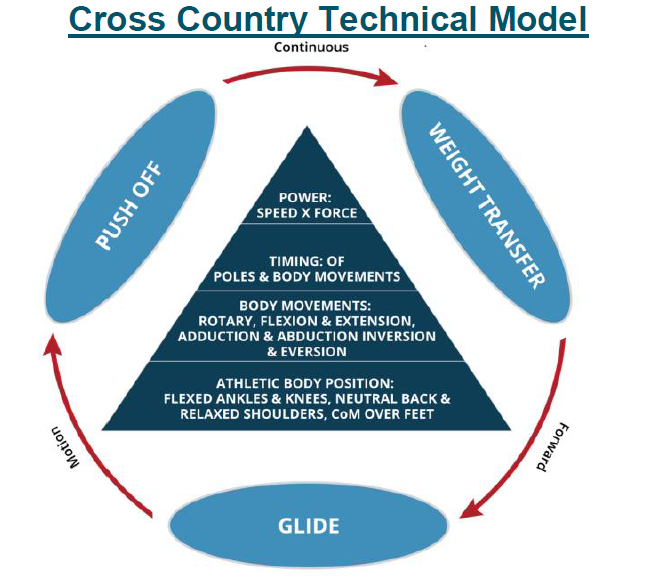
The PSIA Cross Country Technical Model organizes ways to understand, teach, and analyze cross country skiing. This skills-based model gives instructors useful tools for teaching the skills of skiing efficiently and maintaining continuous forward motion.
Performance Pyramid
Athletic Body Position – A flexed loose ready position to maintain balance over your skis (Base of Support)
- Flexed ankles knees and hips
- Neutral Spine
- relaxed shoulder pulled back
- Head up looking forward
- Engaged Core
- Maintaining balance over the balls or center of your feet
Fundamental Body Movements – The fundamental movements of all joints include:
- flexion/extension (load / release spring in legs and arms )
- abduction/adduction (Hip, Leg away/towards center) (Elbow, away and towards center)
- Inversion and eversion (Edging to Little toe/ Big toe)
- rotation. (Toes rotated Externally / Internally) (Shoulder or hip rotated forward / back)
- All movements originate from the core to the extremity (big muscles move first followed by smaller)
Timing of Poles and Body Movements – Timing of poles and body movements
- Simultaneous
- Sequential
- Rate or Tempo of Poles and Body Movements
Power – Speed x Force – Adding power to properly timed poles and body movements to optimize push off or glide)
- Duration
- Intensity
- Rate
- Timing
- Orgin and direction of movements
Essential Skills for Continuous Forward Motion
Push-off – Control the timing of body movements while regulating power application through the skis and poles to optimize propulsion
Weight Transfer – Control the relationship of the center of mass to the base of support:
- from ski to ski
- For and aft to direct pressure along the length of the ski or edge
Glide – Utilize body movements and poles to manage momentum (gliding forward or slowing down on a downhill).
Beginner Lesson (Classic or Skate skis off/on)
Introductions – Instructor and Students
Introduce Athletic Body Position (Classic or Skate skis off/on)
- Jog in place – focus weight towards ball of the foot
- Jump up and down – focus landing softly
- Pop Ups – Flexion and dynamic extension
- 3 legged stool – foot balance drill
- Drop Squats – Extension and dynamic Flexion
- “Panic button” – Way to catch your balance
- Balance Single Foot – focus Weight over base of support
- Hop Foot to foot to side – focus weight change
- Add arms – to help balance
- Jump side to side – small and largeuse extention of the legs to move to the side
- Rotate hip – to form half circle with foot
- Hop four quandrants – of circle
- Fall forward – focus spring fall forward
- Lunges – forward or to side
- Small steps – focus on springing up and forward
- Increase distance between steps – focus more energy and weight forward
- Use cones – vary distance
Introduce Ski Shapes (Classic or Skate skis off/on)
- Basic ski positions in place – Focus on moving skis
- H – parallel – focus flexing and extension
- V – Skate or step turns – focus using hip and pointing knee towards ski tip
- A – Snowplow – focus using hip and pointing knee towards ski tip
- X – Demo Danger to recover
- Introduce edging vs flat ski – focus fall line
- Panic Button – Drop Squat, flexed lower body
- A – wedge position using hip joint and upper leg to knee roll and edge
- A – wedge position relaxing hips and upper leg roll to a flat ski
- Tip Pinwheels – vary speed in a circle together
- Tail Pinwheels – vary speed in a circle together
Classic Progression Skis and Poles (skis on)
Introduce Weight Transfer
- Jogging in place
- focusing on the movements and timing
- focusing weight transfer zipper line over each stepping ski
- Jogging forward
- focusing on catching yourself
- Focusing on Flexing and Extending
- Adjust for different terrain – tempo verses step distance
Introduce Glide
- Jogging in place – quick quick pause
- Jogging forward –
- Step step and long glide
- Step glide step glide
Introduce Ski Push off
- Demo Static
- Load ski to flatten grip pocket
- Grip snow and claw
- Scooter Drill one ski on one ski off
- Set up boot forward ski back off snow
- Set Grip pocket dynamically
- Claw backwith boot foot
- Swing ski foot to a soft landing
- Scooter Drill switch ski foot
- Scooter Drill both skis on
Introduce Pole Pushoff
- Double Pole
- Static
- Hands up hips up elbows forward
- Flex legs until poles hit ground
- Moving forward
- Hands up hips up elbows forward
- Fall onto poles hit leaning forward
- Flexing legs and push elbows back
- Single Pole Striding
- Static
- Alternating Hands up hips up elbows forward
- Fall onto poles hit leaning forward
- Flexing legs and push elbows back
- Moving forward
- Alternatin Hands up hips up elbows forward
- Fall onto poles hit leaning forward
- Flexing legs and push elbows back
Introduce Classic Stride
- Put it all together and go skiing on different terrain
- Optimizing push off
- Optimizing glide
- Manage Momentum
Skate Progression (skis on)
Weight Transfer along the skis
- Split skate static drill – focus on starting to move skis moving by cues
- Cue 1 – “Press knees toward tips of skis.”
- Cue 2 – “Maintain a forward shin angle.”
- Cue 3 – “Feel weight toward the ball of the foot.”
- Cue 4 – “inside edge on skis”
- Cue 5 – “Move hips chest and head forward.”
Weight Transfer foot to foot
- Split skate forward
- add stepping – one ski in at a time
- add weight transfer – from ski to ski
- progressing – “”free” skate down and up
Ski Push Off
- Static Push off –
- Pre load
- Extend
- Weight Tranfer
- Marathon skate one ski in track one skating out of the track
- focus on push off cues of skating leg :
- Pre Load – Flex
- extend skating ski to return to track
Glide
- Marathon skate focus on moving hip back to the track fully to extend the glide
- Speed skate or “free skate” drill, no poles, slight incline
Pole Push-off
- Static: Hands high rotate at shoulder, elbow 90 degrees, elbow forward elbow back
- Simple: in Track focus elbows forward and backposition
- Complex: focus falling on to poles and using Weight Transfer and leverage to move forward
- Complex: focus on adding some flextion in your knees after fallig on your poles
- Practice: on varying Terrain, Adjust tempo and stride
Coordinating Skis and Poles
- Put skis and poles together- focus on allowing student to experiment with rhythm
- Allow the students rhythm they do naturally to do either V1 or V2
Skate Progression – Timing
Introduce V2 alternateTechnique – Timing
- No poles free skate gliding over line then stepping
- hold poles in middle simulate double pole- Skate and (hands high body forward) Pole (double pole)
- Add poles: Static Rhythm – Skate and (hands high body forward) Pole (double pole)
- Ski it!
Introduce V1 Technique – Timing
- No poles skate down line standing low
- Skate Line focus on body on the line and feet pushing side to side never touching the line
- Add poles: Static Rhythm – three (points of contact poles and skate) , and one skate
- Ski it!
Introduce V2 Technique – Timing
- No poles free skate gliding over line then stepping
- hold poles in middle simulate double pole- Skate Skate and (hands high body forward) Pole (double pole)
- Add poles: Static Rhythm – Skate Skate and Pole
- Ski it!
Introduce Up Hill Progression (Skate or Classic)
- Gentle uphill, Jog – focus gripping when weight is going down
- Steeper uphill, Herringbone – focus on rotating from the hip not ankles uphill edging
- Steeper yet, Sidestep w skis – focus on uphill edges and pole for balance
- Steepest, skis off sidestep, focus on using poles and skis plus look up hill off to the side
Introduce Controlling Speed downhill Progression
- Half wedge – focus on opening up from the hip and not at the ankle
- Pop Ups – Flat skis
- Pop down – edged skis
- Turning wedge – Flat Skis unless stopping!
- Step turns
Getting Up After a Fall
- Untangle skis and poles – Dead Bug
- Skis below you and across the hill
- Take off Pole straps and or poles
- Get body towards tips and alongside skis
- Kneel trying to touch ski tips
- Get one knee up and place ski beneath it
- use hand on knee to help you get up
Review and Preview Wrap Up and Closing
Review the Experience
- Lesson
- Goals
- Progress
Preview the Next Experience
- Make a Plan for practice
- Build Upon new learning
- Invite them back for another lesson
- Offer discount pass if buy today!
